How to Get Rid of Ads by Traffic Junky Adware on Your Computer
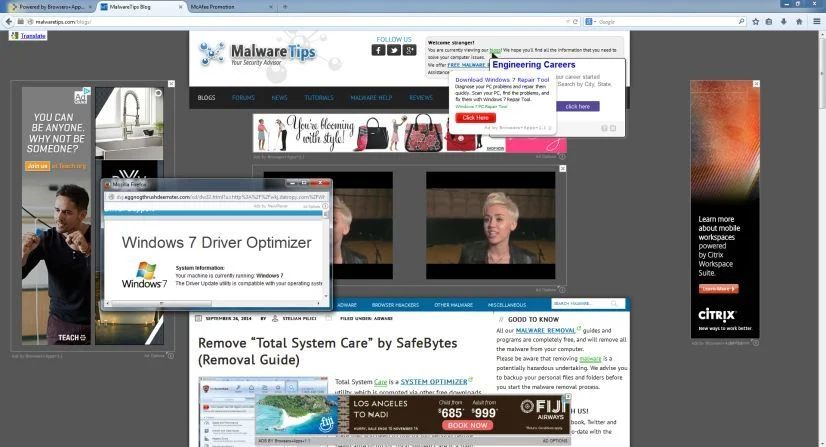
You open a normal website. A pop-up covers the page. A banner flashes in the corner. A new tab opens on its own. The label on the ad says “Ads by Traffic Junky.” Now you wonder if your computer has a virus.
Take a breath. This problem is common, and you can fix it. This guide shows you exactly how. You will learn what Traffic Junky is, why its name shows up on your screen, and how to remove the adware that causes it. You will also learn how to keep it from coming back.
The steps cover Windows, Mac, and Android. They also cover Chrome, Firefox, Edge, and Safari. Follow them in order. Most people clear the problem in under an hour.
Quick Answer: How Do You Remove Ads by Traffic Junky?
You remove Ads by Traffic Junky by deleting the adware that injects them. Here is the short version:
- Uninstall unknown or recently added programs from your computer.
- Remove suspicious extensions from every browser.
- Revoke notification permissions for unfamiliar websites.
- Reset each browser to its default settings.
- Run a full scan with a trusted anti-malware tool.
- Check startup items, scheduled tasks, proxy settings, and the hosts file.
- Restart your computer and test your browsers.
- Install an ad blocker and update everything.
The rest of this guide explains each step in detail. Skim the headings to find the part you need. Read the full guide if the ads keep returning.
What Is Traffic Junky?
Before you fix the problem, you need to understand it. The name “Traffic Junky” confuses many people. It sounds like malware. It is not malware.
Traffic Junky Is a Real Ad Network
TrafficJunky is a legitimate advertising platform. A company in Montreal launched it in 2008. Advertisers use it to buy ad space. Website owners use it to earn money from visitors. The network focuses on adult-oriented websites. It also serves display banners, native ads, video ads, and pop-under ads.
The platform works on a bidding model. Advertisers pay for every thousand ad views. That pricing method is called CPM. Large sites then show those ads to their visitors.
Security researchers do not call the company a malware author. Several review sites rate it as an established network. Antivirus engines do not flag its main domain as a virus in most scans.
Why Its Name Appears on Your Screen
If the network is legitimate, why do you see its name during an infection? The answer lies in how bad actors use ad networks.
Adware programs inject extra ads into the pages you visit. Some of those ads come from real ad networks. Traffic Junky is one of them. The adware owner collects a small payment each time an ad appears. The website you are visiting earns nothing. The ad network may not even know the adware is involved.
So the “Ads by Traffic Junky” label does not mean the network infected you. It means something on your computer is pulling ads from that network and forcing them onto your screen.
Adware Versus a Virus
People call this problem a “virus.” That label is not quite right. A virus copies itself and spreads to other files. Adware behaves differently. It sits on your computer and pushes ads.
Security experts classify most Traffic Junky adware as a potentially unwanted program. They shorten that term to PUP. A PUP is not always destructive. It still invades your privacy, slows your system, and opens doors for worse threats.
Treat adware seriously. Remove it fast.
Why You See Ads by Traffic Junky
Several different problems can trigger these ads. Knowing the cause helps you choose the right fix.
Adware Installed on Your Computer
This is the most common cause. A program on your system injects ads into every site you open. You see pop-ups on sites that normally have none. You may see ads on pages that block ads.
Malicious Ads on Risky Websites
Some websites carry aggressive ads. Pirated movie sites, free streaming pages, and shady download portals fall into this group. Their ad slots often pull from low-quality networks. A bad ad can trigger a redirect, even when your computer is clean.
Ask yourself one question. Do the ads appear on every site, or only on a few? If they appear only on a few risky sites, your computer may be fine. An ad blocker may solve the issue.
Abused Push Notifications
Many websites ask permission to send notifications. A scam site may trick you into clicking “Allow.” The page might say “Click Allow to prove you are not a robot.” After you click, the site sends ads to your desktop, even when your browser is closed.
Push notification spam looks like adware. It acts like adware. But it lives inside your browser settings, not in your installed programs. You must remove it separately.
Hijacked Browser Settings
Some adware changes your home page, search engine, or new tab page. It may also add a proxy server or change your DNS settings. Those changes route your traffic through servers that insert ads.
Signs Adware Has Infected Your Computer
Look for these warning signs. One sign may not mean much. Several signs together point to an infection.
- Pop-ups appear on sites that never showed them before.
- New tabs open without your clicking anything.
- Your home page or default search engine changes by itself.
- Banners appear in odd places on trusted sites.
- Links on a page turn into underlined ad keywords.
- Your browser redirects you to unfamiliar sites.
- Your computer runs slower than usual.
- Your browser crashes or freezes more often.
- Unknown toolbars or extensions appear.
- You see programs you never installed.
- Notifications pop up on your desktop from sites you do not recognize.
- Your fan runs loudly even when you do nothing.
Check your list. If you ticked three or more, assume adware is present. Move ahead with the removal steps.
How Adware Gets on Your Computer
Adware does not appear from nowhere. You usually let it in without knowing. Learn these entry points. They will help you avoid reinfection.
Software Bundling
Many free programs include extra software. The installer hides that fact. You click “Next” five times and accept everything. The extra software lands on your computer with the program you wanted.
Bundling is the top cause of Traffic Junky adware. Free video converters, PDF tools, and media players often carry it.
Fake Updates and Fake Alerts
A pop-up warns that your video player or browser needs an update. You click the button. You actually download adware. Real updates come from the software itself or from the official site. They do not come from random pop-ups.
Cracked Software and Pirated Media
Cracked programs and illegal downloads carry extra payloads. The people who crack software often add adware or worse. You save money on the program and pay with your privacy.
Malicious Browser Extensions
Some extensions look useful. They promise coupons, PDF tools, or video downloads. After you install them, they inject ads. Some extensions start clean and turn malicious after an update.
Deceptive Buttons and Prompts
Shady sites show several “Download” buttons. Only one is real. The fake ones lead to adware installers. Some sites also use fake error messages to push you into a download.
Is Traffic Junky Adware Dangerous?
The ads themselves can hurt you in several ways. Do not ignore them.
Privacy risk. Adware can read the pages you visit. It can track your clicks and searches. Some adware sends that data to third parties.
Scam exposure. Pop-ups often carry fake prize offers, fake virus warnings, and fake tech support numbers. A single wrong click can cost you money.
Further infections. Adware often downloads other unwanted programs. Some ad redirects lead to sites that attack browser weaknesses.
Slower performance. Adware uses memory and processing power. Pages load slowly. Your battery drains faster.
Content risk. Ads from an adult-focused network can show explicit images. These may appear at work or in front of your children. That risk alone justifies a fast cleanup.
Before You Start: Prepare Your Computer
A few minutes of preparation make removal smoother and safer.
Back Up Your Important Files
Copy your documents, photos, and other key files to an external drive or cloud storage. Removal tools rarely harm personal files. A backup still protects you against surprises.
Use an Administrator Account
Sign in with an account that has administrator rights. Removal tools need those rights to delete protected files.
Write Down Your Browser Bookmarks
Resetting a browser may remove extensions and settings. Chrome, Firefox, and Edge usually keep your bookmarks and saved passwords. Export your bookmarks anyway. That takes one minute and removes the worry.
Stay Online, But Be Careful
You need an internet connection to download removal tools. Avoid risky sites during cleanup. Download tools only from the official websites of the vendors.
Consider Safe Mode for Stubborn Cases
Some adware fights removal. It restarts itself or blocks uninstallers. Safe Mode loads Windows with only essential services. That stops most adware from running. Use it if normal removal fails.
To enter Safe Mode with Networking in Windows 10 or 11:
- Open Settings and select System.
- Choose Recovery.
- Click Restart now next to Advanced startup.
- Select Troubleshoot, then Advanced options, then Startup Settings.
- Click Restart.
- Press 5 or F5 to start Safe Mode with Networking.
Your computer restarts with a basic screen. Run the removal steps from there if you need to.
Step 1: Uninstall Suspicious Programs From Windows
Start with the programs list. Adware often appears as a normal application. It may use a vague name like “Video Helper” or “Web Shield.”
Uninstall on Windows 11 and Windows 10
- Right-click the Start button.
- Select Installed apps (Windows 11) or Apps and Features (Windows 10).
- Sort the list by install date. Click the “Install date” header.
- Look at the newest entries first.
- Select any program you do not recognize or did not install.
- Click the three dots or the program name, then choose Uninstall.
- Follow the on-screen prompts.
Uninstall on Windows 8 and Windows 7
- Open the Control Panel.
- Click Programs, then Programs and Features (or Uninstall a program).
- Review the list and sort by install date.
- Select each suspicious program and click Uninstall.
What to Look For
Remove programs that match these patterns:
- Anything with “Traffic Junky” in the name
- Free toolbars, coupon tools, and “shopping assistants”
- Download managers you never chose
- Odd media players and converters
- “PC optimizer” and “driver updater” tools from unknown vendors
- Anything installed on the day your ads began
Do not remove anything you need. If you feel unsure, search the program name online first. Reputable security forums list known adware names.
If a Program Refuses to Uninstall
Some adware blocks its own removal. Try these fixes:
- Restart in Safe Mode and try again.
- Use a third-party uninstaller to wipe the program and its leftover files.
- Run an anti-malware scan, which often removes stubborn entries.
Step 2: Remove Suspicious Browser Extensions
Adware often lives inside browser extensions. Clean every browser you use, even ones you rarely open.
Google Chrome
- Click the three-dot menu in the top right corner.
- Choose Extensions, then Manage Extensions.
- Review every extension.
- Click Remove on any extension you do not recognize or no longer use.
- Confirm the removal.
You can also type chrome://extensions into the address bar. Turn on Developer mode only if you need extra details. Check each extension’s ID and description.
Mozilla Firefox
- Click the menu button with three lines.
- Select Add-ons and themes.
- Open Extensions.
- Click the three dots next to a suspicious add-on.
- Choose Remove.
You can reach the same page by typing about:addons.
Microsoft Edge
- Click the three-dot menu.
- Select Extensions, then Manage extensions.
- Click Remove under any unknown extension.
- Confirm your choice.
Safari on Mac
- Open Safari.
- Click Safari in the menu bar, then Settings.
- Choose the Extensions tab.
- Select a suspicious extension.
- Click Uninstall.
How to Judge an Extension
Ask these questions about each one:
- Did I install this on purpose?
- Do I use it?
- Does the developer have a real website and reviews?
- Does it ask for permission to read all my data on every site?
If you answer “no” to the first two questions, remove it. If an extension asks for broad permissions without a clear reason, remove it too.
Step 3: Block Notification Spam
Notification spam looks like adware, but it hides in your browser’s permission list. Remove those permissions now.
Google Chrome
- Open Settings.
- Select Privacy and security.
- Click Site settings, then Notifications.
- Look under “Allowed to send notifications.”
- Click the three dots next to any unfamiliar site.
- Choose Remove or Block.
On Chrome, you can also switch the main setting to “Don’t allow sites to send notifications.” This stops all future requests.
Mozilla Firefox
- Open Settings.
- Select Privacy and Security.
- Scroll to Permissions.
- Click Settings next to Notifications.
- Select unfamiliar sites and click Remove Website.
- Check “Block new requests asking to allow notifications.”
- Save your changes.
Microsoft Edge
- Open Settings.
- Select Cookies and site permissions.
- Click Notifications.
- Review the Allow list.
- Remove or block unknown sites.
Safari on Mac
- Open Safari Settings.
- Click the Websites tab.
- Select Notifications in the left list.
- Choose unfamiliar sites and click Remove or set them to Deny.
Chrome on Android
- Open Chrome.
- Tap the three dots, then Settings.
- Tap Notifications, then Site settings, and review the list.
- Block any site you do not trust.
Step 4: Reset Your Browser to Default Settings
A reset wipes out leftover changes. It undoes hijacked home pages, search engines, and startup pages. It also disables all extensions. Do this step after you remove extensions.
Reset Google Chrome
- Open Settings.
- Click Reset settings in the left menu.
- Select Restore settings to their original defaults.
- Click Reset settings.
Chrome keeps your bookmarks and saved passwords. It clears temporary data and turns off extensions.
Reset Mozilla Firefox
- Type about:support in the address bar.
- Click Refresh Firefox.
- Confirm the action.
Firefox keeps your bookmarks, history, and passwords. It removes extensions and custom settings.
Reset Microsoft Edge
- Open Settings.
- Select Reset settings.
- Click Restore settings to their default values.
- Confirm with Reset.
Reset Safari
Safari has no one-click reset. Do these steps instead:
- Clear your history. Choose Safari, then Clear History.
- Remove all extensions.
- Check your home page and search engine in Settings.
- Clear website data in Settings, under Privacy.
Step 5: Scan With Trusted Anti-Malware Tools
Manual cleanup catches the obvious pieces. A scanner catches the hidden ones. Use more than one tool for the best results. Different tools find different threats.
Start With Windows Security
Windows includes Microsoft Defender. Run a full scan first.
- Open Windows Security from the Start menu.
- Select Virus and threat protection.
- Click Scan options.
- Choose Full scan.
- Click Scan now.
For stubborn threats, choose Microsoft Defender Offline scan. This option restarts your computer and scans before Windows loads. Adware has a harder time hiding in that state.
Add a Second-Opinion Scanner
Run a dedicated anti-malware program next. Popular choices include these:
- Malwarebytes. It detects and removes adware, PUPs, and browser hijackers. The free version scans and cleans on demand.
- Malwarebytes AdwCleaner. This free tool focuses on adware, toolbars, and browser hijackers. It needs no installation.
- HitmanPro. This tool uses cloud scanning to find threats that other programs miss.
- ESET Online Scanner and similar tools. These offer extra second opinions.
Download each tool from its official site. Avoid sites that bundle downloads. Fake versions of these tools exist. They may carry adware themselves.
How to Run a Scan
- Download and install the tool.
- Update its threat database.
- Close your browsers and other programs.
- Start a full or custom scan.
- Wait for the scan to finish. This can take 20 to 60 minutes.
- Review the results.
- Select all detected items and choose Quarantine or Remove.
- Restart your computer when the tool asks.
Run a second scan after the restart. Confirm that it finds nothing.
Do Not Trust Fake “Cleaners”
Some “PC cleaner” ads claim your computer has hundreds of errors. They scare you into buying software. Many of those tools are scams or adware themselves. Stick with well-known security vendors.
Step 6: Check for Deeper Leftovers
Sometimes the scan removes the main program but leaves hooks behind. These hooks can reinstall the adware or keep showing ads. Check the following areas.
Startup Items
Adware often adds itself to the startup list.
- Press Ctrl + Shift + Esc to open Task Manager.
- Click the Startup apps tab.
- Review each entry.
- Right-click unknown entries and choose Disable.
For a deeper view, use Autoruns from Microsoft Sysinternals. It lists every item that starts with Windows. Look for entries with no publisher or odd names.
Scheduled Tasks
Adware can create a scheduled task that reinstalls itself.
- Press the Windows key and type Task Scheduler.
- Open Task Scheduler.
- Click Task Scheduler Library.
- Review the tasks list.
- Look for odd names and tasks that run scripts or unknown programs.
- Right-click a suspicious task and choose Delete.
Do not delete Microsoft tasks or tasks from software you know. Check each task’s Actions tab first.
Browser Shortcuts
Adware can change your browser shortcuts. The shortcut then opens an ad page every time you launch the browser.
- Right-click your browser shortcut.
- Choose Properties.
- Open the Shortcut tab.
- Read the Target field.
- The field should end with the browser’s .exe file, such as chrome.exe.
- Delete any text after the .exe, such as a web address.
Repeat this for your taskbar and desktop shortcuts. You can also delete the shortcut and make a new one.
Proxy Settings
Adware may route your traffic through a proxy server.
- Open Settings.
- Select Network and internet.
- Click Proxy.
- Turn off “Use a proxy server” unless you set it up yourself.
- Keep “Automatically detect settings” on.
If you use a proxy at work, ask your IT team before changing anything.
The Hosts File
The hosts file maps website names to addresses. Adware sometimes edits it to redirect traffic.
- Open Notepad as an administrator. Search for Notepad, right-click it, and choose Run as administrator.
- Click File, then Open.
- Go to C:\Windows\System32\drivers\etc.
- Change the file type filter to All files.
- Open the file named hosts.
- Read the lines. Lines that begin with # are comments.
- Look for unfamiliar lines under the comments.
- Delete lines that you did not add and that point to odd addresses.
- Save the file.
A clean hosts file contains mostly comments and perhaps a line for localhost. If you feel unsure, leave it alone and ask a technician.
DNS Settings
Some adware changes your DNS servers. Check them.
- Open Settings, then Network and internet.
- Choose Wi-Fi or Ethernet, then your connection.
- Find DNS server assignment.
- Set it to Automatic (DHCP), or enter a trusted public DNS service.
Then flush your DNS cache. Open Command Prompt and run this command: ipconfig /flushdns.
Your Router
Rarely, adware or a hacker changes router settings. Log in to your router. Check the DNS settings. Confirm they match your internet provider’s settings or a service you chose. Update the router firmware. Change the router admin password if it still uses the default.
Step 7: Restart and Test
Restart your computer. Open each browser. Visit a few sites that showed ads before. Watch for pop-ups, redirects, and new tabs.
Wait a day or two. Some adware lies dormant for a while. If no ads appear after a few days of normal use, the cleanup worked.
How to Remove Traffic Junky Ads on Mac
Macs get adware too. The steps differ slightly from Windows.
Remove Suspicious Apps
- Open Finder.
- Click Applications in the sidebar.
- Sort by Date Added.
- Look for unfamiliar apps.
- Drag each suspicious app to the Trash.
- Empty the Trash.
Check Login Items
- Open System Settings.
- Click General, then Login Items.
- Review the list under “Open at Login” and “Allow in the Background.”
- Remove or switch off unknown entries.
Check Configuration Profiles
Adware on Mac sometimes installs a profile that locks browser settings.
- Open System Settings.
- Go to Privacy and Security, then Profiles. On some versions, this appears as its own Profiles pane.
- Remove any profile you did not install.
If you do not see a Profiles section, no profiles exist on your Mac.
Clean Browsers
Remove extensions and reset settings in Safari, Chrome, and Firefox. Use the steps in the earlier sections.
Scan the Mac
Run a trusted Mac security tool. Malwarebytes for Mac handles adware well. Run a full scan and remove what it finds.
Check Launch Agents
Adware sometimes hides in launch agent folders. Open Finder, choose Go, then Go to Folder. Check these locations:
- ~/Library/LaunchAgents
- /Library/LaunchAgents
- /Library/LaunchDaemons
Look for files with odd names and recent dates. Move suspicious files to the Trash. Delete only files you can tie to unwanted software. A scanner makes this safer.
How to Remove Traffic Junky Ads on Android
Adware also hits phones and tablets. The usual cause is a sketchy app or a notification permission.
Remove Suspicious Apps
- Open Settings.
- Tap Apps.
- Sort by recently installed or review the list.
- Tap any unknown app.
- Choose Uninstall.
If the Uninstall button is gray, the app has device admin rights. Go to Settings, then Security, then Device admin apps. Switch off the app’s admin rights. Then uninstall it.
Block Notifications and Pop-ups in Chrome
- Open Chrome and tap the three dots.
- Tap Settings, then Site settings.
- Tap Notifications and remove unfamiliar sites.
- Go back and tap Pop-ups and redirects.
- Make sure the switch blocks them.
Check Display Over Other Apps
Some adware draws ads over other apps.
- Open Settings, then Apps.
- Tap Special app access.
- Tap Display over other apps.
- Turn off the permission for unknown apps.
Run Google Play Protect
- Open the Play Store.
- Tap your profile picture.
- Tap Play Protect, then Scan.
- Remove any harmful apps it finds.
A reputable mobile security app can add a second scan. If the ads continue, back up your data and perform a factory reset as a last resort.
Manual Versus Automatic Removal: Which Should You Choose?
Both methods work. Each has strengths.
| Method | Strength | Weakness |
|---|---|---|
| Manual removal | Gives you full control and costs nothing | Takes more time and can miss hidden files |
| Automatic scanning | Finds hidden parts fast | Needs a trusted tool and can miss new threats |
| Combined approach | Gives the best coverage | Takes the most time |
I recommend the combined approach. Do the manual cleanup first. Finish with two scans. This method clears nearly every case.
What to Do If the Ads Keep Coming Back
Sometimes the ads return after cleanup. Do not panic. Work through this checklist.
Check Whether the Problem Is the Website
Visit a few reliable sites, such as a news site or a search engine. Do the pop-ups still appear? If not, your computer is probably clean. The ads come from the risky sites you visit. Avoid those sites or block their ads.
Try a Different Browser
Open a browser you rarely use. If the ads disappear, your main browser still carries a problem. Remove its profile or reinstall it.
Create a New Browser Profile
A corrupted profile can keep unwanted settings. Make a new profile. Sign in and sync only your bookmarks. Skip the extensions.
Reinstall Your Browser
Uninstall the browser. Delete its leftover folders. Download a fresh copy from the official site. Install it and test.
Run an Offline Scan
Some threats hide while Windows runs. Use Microsoft Defender Offline or a rescue disk from a security vendor. These tools scan before the operating system loads.
Reset Windows Network Settings
Reset your network stack if you suspect deeper tampering. Open Command Prompt as an administrator and run these commands one at a time:
- netsh winsock reset
- netsh int ip reset
- ipconfig /flushdns
Restart your computer afterward.
Use Windows Reset as a Last Resort
If nothing works, reset Windows. Choose Settings, then System, then Recovery, then Reset this PC. Pick the option that keeps your files if you want to avoid data loss. Remember to reinstall only trusted software afterward. A clean install ends nearly every adware problem.
Ask a Professional
If you handle sensitive data, call a trained technician. Do the same if you see signs of a deeper breach. Examples include unknown logins, missing money, or ransom messages.
How to Prevent Traffic Junky Adware in the Future
Prevention beats cleanup. Build these habits and you will rarely face this problem again.
Download From Official Sources Only
Get software from the developer’s official site or a trusted app store. Avoid download portals that wrap installers in their own tools. Skip cracked software completely.
Read Every Installer Screen
Do not click “Next” without reading. Choose Custom or Advanced installation. Uncheck extra offers. Decline toolbars, “recommended” apps, and search engine changes.
Keep Everything Updated
Update Windows, macOS, your browsers, and your apps. Turn on automatic updates. Updates close the security holes that attackers use.
Use a Reputable Security Tool
Run a trusted antivirus with real-time protection. Windows Security does a solid job for most users. Add a second on-demand scanner for extra cover.
Install a Quality Ad Blocker
An ad blocker stops many malicious ads before they load. It also reduces tracking. Pick a well-reviewed blocker from the official extension store. Avoid ad blockers from unknown makers. Some of them carry adware themselves.
Use a Protective DNS Service
A protective DNS service blocks known bad domains for every device on your network. Many services offer free plans. Set one up on your router or on each device.
Be Careful With Notification Prompts
Click “Block” on notification requests from sites you do not know. Never click “Allow” to prove you are human. A real site does not need that.
Limit Your Extensions
Install only extensions you truly need. Check each one’s reviews, developer, and permissions. Review your extension list every few months.
Avoid Risky Corners of the Web
Pirate streaming sites and shady download pages carry the most malicious ads. Stay away from them. Use legal streaming services and official software sources.
Do Not Click Pop-ups
Close pop-ups using the browser’s tab close button or the Task Manager. Do not click inside the pop-up. Even a “Close” button inside the ad can trigger a download.
Back Up Your Data Regularly
A backup protects you from the worst outcomes. Use an external drive or a cloud service. Keep at least one copy offline.
Use a Standard Account for Daily Use
On Windows, a standard account limits what installers can change. Use an administrator account only when you must install or update software. This habit blocks many silent installs.
How to Stay Safe on Adult Websites
Because Traffic Junky mainly serves adult sites, many people meet its ads while browsing those sites. The ads there come from many sources. Some are aggressive. Follow these rules to lower your risk:
- Use a modern browser with the latest updates.
- Install a reliable ad blocker.
- Never download files or players that a site asks you to install.
- Never enter payment information on a pop-up page.
- Use private browsing if you want fewer stored traces, but remember that it does not block malware.
- Watch the address bar. A redirect to an odd web address is a warning sign.
- Keep notifications set to “Block” by default.
These steps protect you on any site, not only adult ones.
Common Mistakes to Avoid
Many people make the same errors during cleanup. Avoid these:
- Skipping the browser reset. Hijacked settings can linger after you uninstall the program.
- Trusting the first tool you find. Fake security tools exist. Use known vendors.
- Paying for fake support. Pop-ups that list a phone number are scams. Never call them.
- Deleting random system files. You can break Windows. Remove only what you can identify.
- Forgetting other devices. Phones and tablets that share your accounts may need cleanup too.
- Ignoring other browsers. Adware often sits in a browser you rarely use.
- Stopping after one scan. Run a second scan after a restart.
Frequently Asked Questions
What does “Ads by Traffic Junky” mean?
The phrase means an ad came from the Traffic Junky advertising network. The network is legitimate. If you see the label on sites that normally show no ads, adware on your computer probably inserted the ad.
Is Traffic Junky a virus?
No. Traffic Junky is an ad network, not a virus. Adware that abuses its ad inventory can still harm your experience. Security experts classify that adware as a potentially unwanted program.
Is Traffic Junky safe?
The network itself runs as a registered business. Its ads can still lead you to unsafe pages. Bad actors sometimes buy ad space for scams. Treat every pop-up with caution, and never enter personal data on a page you reached through an ad.
Why do I see Traffic Junky ads on every website?
You likely have adware or a malicious browser extension. It injects ads into every page you open. Remove it with the steps in this guide.
Can Traffic Junky adware steal my information?
Some adware tracks your browsing and sells that data. It can also lead you to phishing pages. Remove it quickly. Then change passwords for sensitive accounts if you entered them on suspicious pages.
How do I stop Traffic Junky pop-ups in Chrome?
Remove unknown extensions. Turn off notifications for suspicious sites. Block pop-ups and redirects in Site settings. Reset Chrome to its defaults. Then scan your computer with an anti-malware tool.
Will a factory reset remove the adware?
Yes, in almost every case. A reset wipes the system and installs a fresh copy. Use it only after simpler steps fail, because you must reinstall your apps.
Do I need to pay for removal software?
Not always. Windows Security and free versions of well-known tools handle most adware. Paid versions add real-time protection and automatic scans. Choose them if you want continuous cover.
Can my phone get Traffic Junky adware?
Yes. Android phones can pick up adware through shady apps and notification spam. iPhones face fewer app-based threats. Both can still show ads from spam notifications or calendar invites.
How long does removal take?
Most people finish in 30 to 90 minutes. Full scans take the longest. Stubborn cases may need extra time.
Could my router cause the ads?
It can, but this is rare. Hacked or misconfigured routers can change DNS settings. Check your router’s DNS entries and update its firmware.
Should I change my passwords after removal?
Change them if you entered credentials while adware was active, or if you suspect tracking. Start with email, banking, and social media accounts. Turn on two-factor authentication where you can.
How can I tell whether the ads come from my computer or the website?
Test several trusted sites in a different browser, and try another device on the same network. If the ads appear only on one computer, that computer carries the problem. If they appear only on certain sites, those sites cause them.
Key Takeaways
- Traffic Junky is a real ad network. Adware abuses its ads.
- The ads appear because something on your computer injects them.
- Uninstall suspicious programs and extensions first.
- Block notification spam in every browser.
- Reset your browsers to their defaults.
- Scan with Windows Security and at least one second tool.
- Check startup items, scheduled tasks, shortcuts, proxy settings, and the hosts file.
- Use official downloads, read installer screens, and keep software updated.
- Add an ad blocker and a protective DNS service for long-term cover.
- Use a full reset only when everything else fails.
Final Thoughts
Ads by Traffic Junky look scary, but you can beat them. The network itself is not your enemy. The adware that abuses it is. Remove that adware, clean your browsers, and scan your system. You will see the pop-ups vanish.
Then protect yourself. Download carefully. Update often. Block what you do not need. These habits take little time. They save you hours of cleanup later.
Start with Step 1 today. Work through each step in order. Your browser will feel fast and clean again.